next < Page 3, 2, 1 > previous
5 april 2017
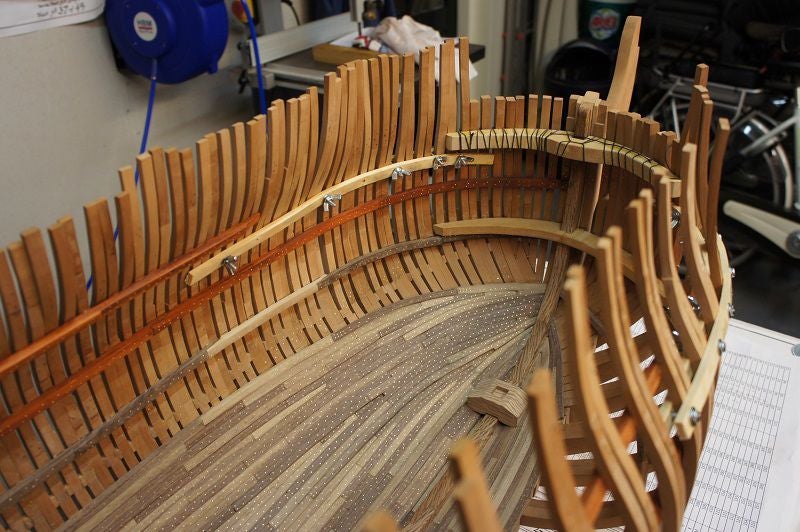
All the gun holes are there in. Before I got Vic from the mold, I first draw the underside of the lower wale on the hull. Under this wale will now 42 rows of shelves be placed.
Last week I completed the test to get a good black seam between the planks. To get the seams good black is black paper glued between the planks. Alexandru gave the tip to use black completely soaked paper. Indeed, there is also black paper which is white in the middle, if you use it you will get no good effect. I previously bought two kinds of black paper, 120 grams and 230 grams.
The test I have several thicknesses of paper glued between black walnut, cut and sanded. After extensive discussions here at home, we decided to stick between the planks 1x 230 gram black paper. This gives the best results, especially since the planks on the hull just 5.2 mm wide. It's a lot of work, but the result counts.
The shelves are also fixedly put with wooden pins on the hull. These pins are made of walnut. There is now a large stock Castello boards, paper and pens ready, still off a few lines (harpins) and then we can start
__________
Regards
Henk


2 april 2017
Vic slowly begins to be more impressive, especially through the gun holes. I expect next week to have made all the holes.
Besides making the holes I've been working hard to get everything ready for the planking of the underside of the hull. It is already decided that the planks are made of Castello. This wood gives has the best contrast with the black seams, the wooden pins and copper plating.
The black seams between the planks is a special challenge. The sides blacken will not work with a pencil or pen. The wood is later treated with oil and then gives it stains. You can pencil / pen only apply if you leave or untreated wood cover with varnish. From experiments showed the effect of pencil and / or pen also to be too small on this scale, after sanding you see hardly anything of a black seam.
Last week I got a good tip from Alexandru. Is a lot of work, but the first results look good. A few more tests, buying stuff, etc., next week ...... more.
__________
Regards
Henk


25 march 2017
The measuringn of all gun holes took a few evenings. The height of each corner is now in an Excel sheet. Now draw the holes on the hull, then fix the frames to be sure and saw ...... but at least the last I thought.
The morning has certainly taken an hour before I could put the saw in the hull. The measures were properly transferred, but saw in my hull ... what if ... the form will not go out .... is my method good? According to my wife, I walked along one hour and again and I was pretty nervous.
The application of the horizontal bars takes quite extra time. The ends of these bars are bevelled and placed downwards with the longest side. So they stabbing something in the frames. These frames must therefore be provided with a recess.
The method works and the first four holes there after working all day. 51 more to go.
__________
Regards
Henk


19 march 2017
The final frames are there, and the last of the Middle Deck Deck Clamps are drying on the bending former. These are placed in the next week and then I can start the next subproject .... applying the horizontal bars in the frames so that the gun holes occur.
We've talked here again extensively tonight, but I bring these horizontal bars only in the closed side of the ship. If these bars are placd into the open side, the visibility is limited at that moment.
__________
Regards
Henk


18 march 2017
I finally agreed to run a big production in the past week. The Stern is completed, all Sterntimbers are placed. So I started with the placement of the last frames.
Meanwhile, all frames placed on the port side, including the passages of the Quarter galleries to the decks.
__________
Regards
Henk


11 march 2017
In recent weeks I have not been so much work to Vic. We had a move within the family, and still goes into more time than people think. Tomorrow one last day and then the move is completed.
I've mapped the sizes of the rear side ribs in the evenings. After yesterday to have some wood stock quickly made, I could start today with the outer Sterntimbers. Besides the outer Sterntimber will still be a short Sterntimber and these are the most difficult frames.
It was so much measure today. I must separately measure all components and adhesives. At the end of the afternoon the outer Sterntimber was dry, he could be sanded and placed. The short Sterntimber is drying. Overall I've been busy all day with two frames.
Next week still places the short Sterntimber and then I can start making the last two for the other side.
___________
Regards
Henk


26 february 2017
In the past week, all Balkwegers the Upper Deck, Quarterdeck and Poopdeck are placed. These are coupled to the Sternconstruction.
The outer Sterntimbers could not be applied because the mold was in the way. This morning I removed all the clips to see how stable the structure is now. Everything is in place and without the clips there is no movement. So the extra mold was finally gone.
After the mold was gone, everything could still be sanded. So I can now continue with the application of the outer Sterntimbers and frames for the Quartergalaries.
___________
Regards
Henk


20 february 2017
Meanwhile, 8 of the 10 Sterntimbers are placed and also the last bam off the Poopdeck is placed. Next, another pair of brass pins must be places and then I first extend the Deckclamps.
___________
Regards
Henk


17 february 2017
Last week I finished the mold for the sternconstruction and all parts are cut and bent. The backbeam of the Poopdeck is now drying in the bending mold, but I do not need him yet.
Today, I made the first Sterntimber and placed it on the mold. Last week I wrote that I would first extend the Balkclamps, but it is better to place first all Sterntimbers. In this way, I have a stable construction and I can make good connect with the hull.
___________
Regards
Henk


12 february 2017
Last week I made quite a few drawings. I could today finally started with the mold for the Star Construction and making the rear Beam from the Upper Deck. This bar is made in the curve of the deck and the curve of the stern. The back of this bar is beveled, the Sterntimbers close there now flat against it.
With the extra mold are fixedly put the rear beams of the cover at the correct height and length. It is an additional mold on the bottom plate. The middle beams ensure that the deck beams sitting at the correct height and correct length. The deck beams are supported on the sides with two separate beams. This will equip the Beam and Deckclamps. In this manner, are directly than the corners at the correct height and length.
It was just playing around with all sorts of information, but everything is now in the right place. I can now start bending and placing the rear deck beams of the Quarterdeck and Poopdeck. Once these are in the right place, the remaining Deckclapms can be extended.
___________
Regards
Henk


10 february 2017
Last week I've been busy with preparations for the construction of the Stern and the frames for the Quarter Galleries. In addition to building a flexible bending / gluemold, I have a structure designed for the mold. This is intended to secure the rear of the ship on the mold and to keep her right (90 degrees). After the two parts are placed on the mold, I could her alignment and secure. So I can now start plotting the sizes for Sterntimbers, etc.
Meanwhile the steamer once again started to bend the first part. This is the last deckbar of the Upper Deck Beam. This walking around in the height and width. This bar is the basis for placing further the Sterntimbers against it.
The bending is now quite simple ... set the mold in the curve and once the wood is sufficiently steamed immediately encounter terminals. I am satisfied
___________
Regards
Henk


5 february 2017
The Deck Clamps are almost all places, the front is ready. This morning everything sanded and turned the mold. Next week the rear side of the hull is again fixedly put on the mold. Then all sizes can be transmitted, including the latest Deck Clamps, side frames, etc.
____________
Regards,
Henk


29 january 2017
It goes well with placing the Deck Clamps. It is now mainly wood steaming and bending to complete the bow. The Hooks Deck the Middle Deck and Upper Deck, I'm going to be place them later, otherwise I can not work in the bow.
I expected next week all the Deck Clamps are placed in the bow. Then I go first sanding the outside of the hull. As soon as the upper part of the outside of the hull are sanded , I can start working on the next project, namely the stern en de Auartergallery.
In this project, the sterntimbers for the stern and the frames of the Quarter Gallery are going to be placed. It's a big job to clarify all sizes and my whole desk is full of drawings, photographs, etc. A nice job to prepare for the hours that I can not build.
____________
Regards,
Henk


22 january 2017
Bending Pandok is now going well. The Deck Clamps of the Middle Deck are places on the port side. The Deck Clamps are bent on starboard tack and are now drying, which come of the week. At the back I stopped a little earlier because the Deck Clamps soon go through there in the side mirrors. I extend the Deck Clamps at once I start there.
Meanwhile Deck Clamps for Upper Deck are also largely places. The last pieces of the Upper Deck must first be bent yet. So I started the Deck Clamps for Quarterdeck. The first two parts are now placed. I clamp the connection of the 2 Deck Clamps between 2 steel conductors, so that the shelves are straight to each other. Thus I avoid the middle of the torso is bent inwards.
Due to the progress disappear the temporary clamp slats. I always remove a small area so that the body stays in shape.
____________
Regards,
Henk