Pagina 1, 2 > next
13 july 2020
I've decided to work this deck from the back to the front. Then I can also work on the Brodie in between. The beams of the Upper Deck run around more than the decks below. As soon as the beams are put together, they are directly placed in my bending mould to dry. After drying, the deck beams remain in the correct curvature.
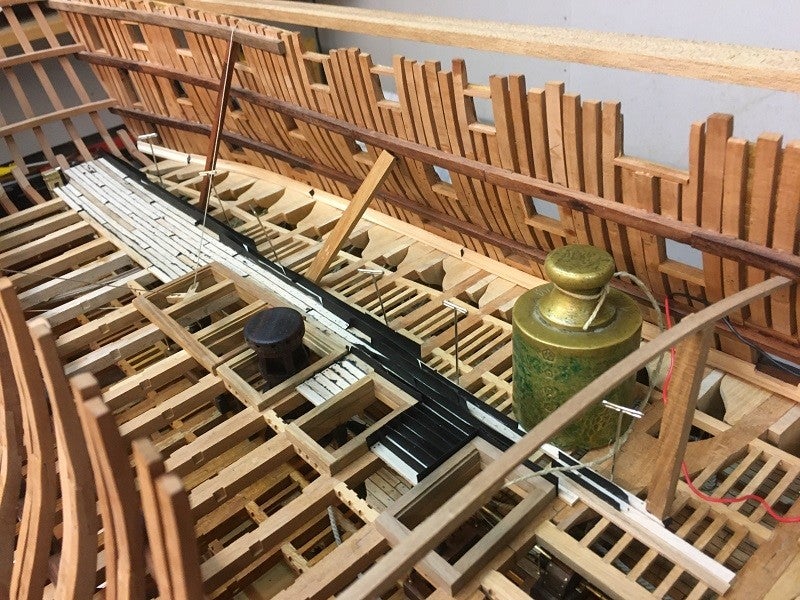
According to my lighting plan there will be 8 lanterns on the Middle Deck. So I made all 8 lanterns right away.


While plating the hull, I processed two coils. These coils work with 5 volts. On each coil about 15 x 2 led lights, connected in series, can be lighted. On the lower decks are now 16 series of 2 led lights. On the Middle Deck and the decks above I have to use the other coil. It's now over three years ago that I placed the coils. It was quite a search for the second coil, this coil was hidden behind one of the carriers where Vic is now on.
So this last one meant I had to move one carrier and for that she had to get rid of the standard. This was more difficult than I thought. The lady has gained a lot of weight and now weighs more than 25 kg. In the end the carrier is in another place and I can easily reach the coil. The electric wire boom is now installed.


When placing the 24 Pound Guns, the tackles and the controls of the hatches must also be made. With every Guns and hatch I am busy for a few evenings. I make these as much as possible on the evenings on weekdays, so I can work on Vic in the weekends.
Meanwhile two 24 Pounders have been placed and the first lantern has been hung. Next week I will make the first operation of the rear hatch.
We will continue steadily with the installation of the Middle Deck.
_____________
Greetings,
Henk


13 june 2020
In reality, Vic's Stern view is slightly different from what many building kits show. Now it has been a lot of work to build the inside of the stern the way it was actually built. After measuring everything, I made the backseat fit to the rafters of the stern. After that I covered the frames with wood.The windows can, in a later stage, be placed from the outside.
After that I finished the main entrance with Ebony and there's a grid on the inside. As far as I can check the drawings, this is meant to catch the first dirt of the shoes/boots.
Although the windows will be made and placed later, some consultation was needed to make a choice for the type of wood I will use for this. On the outside these windows are gold colored and this color matches the ornaments. After making a sample, the Satin wood, which I used for the hull, turned out to be too brittle to make window styles to scale. In addition, it is too fragile to make ornaments from it. After advice from Amsterdam Fijnhout, where I got all my wood from, I could best choose between Yellow Cedar or Osage Orange. I bought both types of wood, so we can always make the right choice.
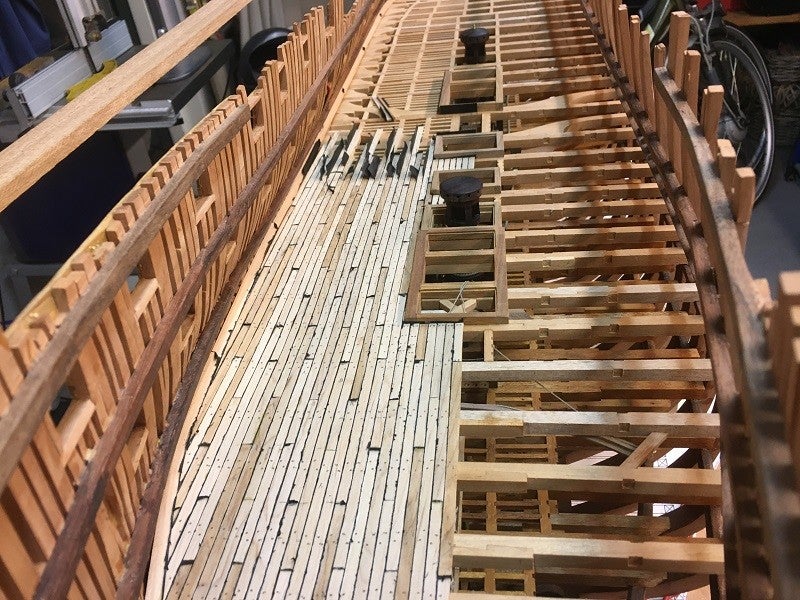
The deck construction of the "Upper Deck" is a lot lighter than that of the "Middle Deck" and the decks below. In between all the work I did a lot of sawing and sanding to prepare the beams. The wood stock is now so big that I will build the upper decks.
Finally the breechings for the Guns had to be made. Because the ropes are quite thick, I always leave them hanging for 24 hours with some weights. This way the ropes stay tidy and are easier to shape. The breechings are now also ready and attached to the carriages. It is now a matter of making hoists and placing everything.
The only thing I have to finish now is "The Brodie". The last parts have been ordered and I'm going to finish them in the near future. I'm now going to start placing the "24 pound Guns", prepare the operation of the hatches and install the deck construction of the "Upper Deck". Of course the lighting of the deck will be included in this construction again.
_____________
Greetings,
Henk


3 may 2020
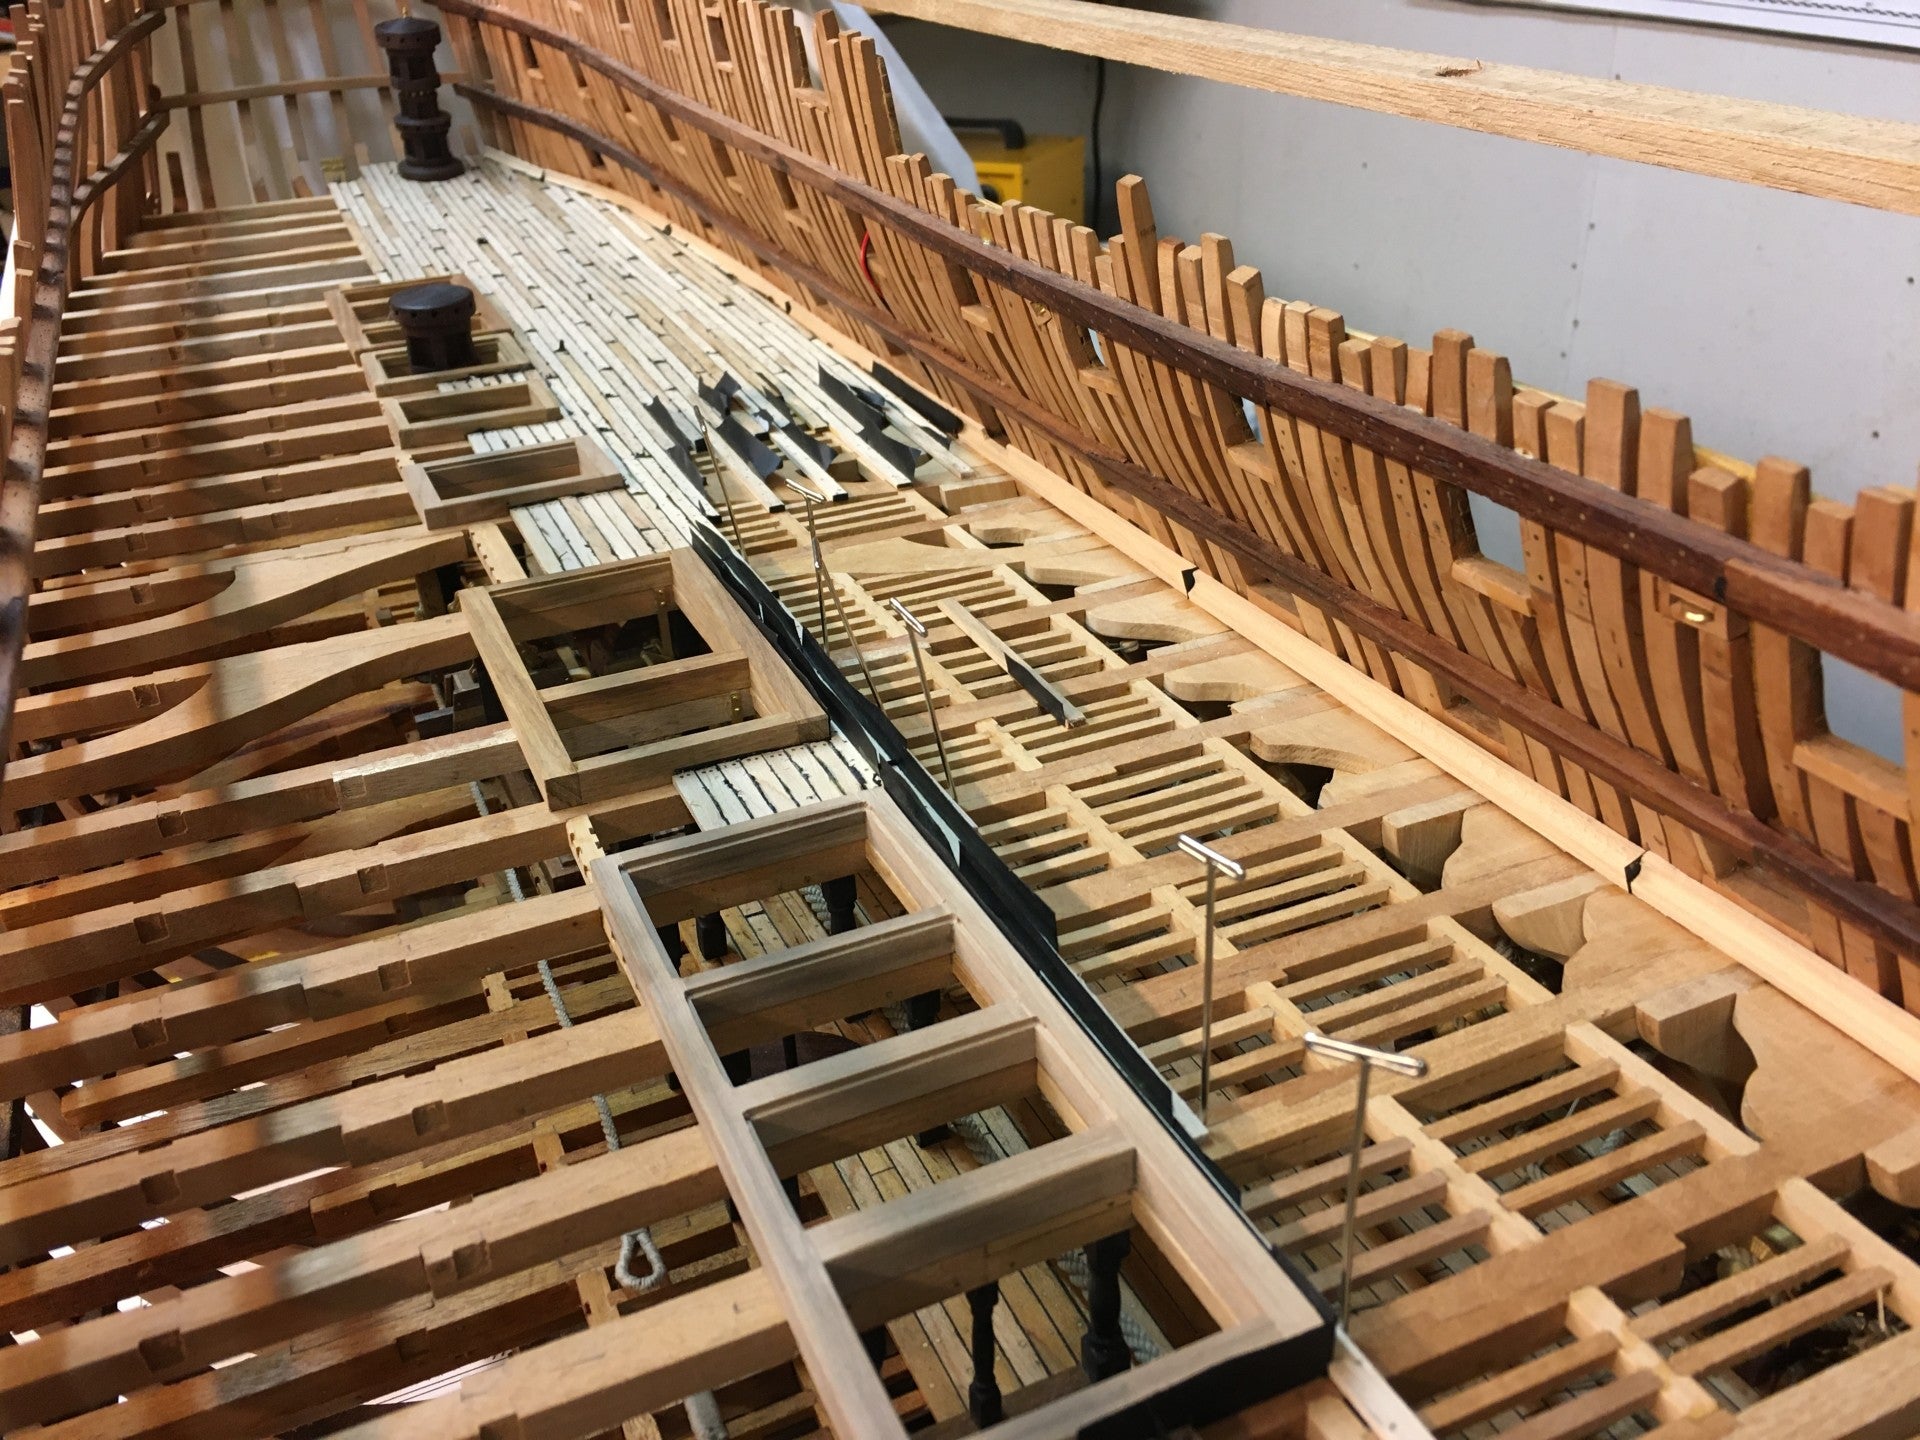
Besides the project "24 pound guns" I've been working on all kinds of small subprojects in the past weeks which all took a lot of time. First I started with the installation of all hatches for the 'gunports'. I'll pick up the main entrance later. During the production of these hatches, they were made directly to thickness as far as the wale are concerned. The front hatch consists of 2 doors and I made these in closed position.


Above a number of hatches there are 'Drip Shields' and these are quite different from those of the 'Lower Deck'. I decided to make these out of two parts, a left and a right version. I spent quite a few hours behind the milling machine, but I am very satisfied with the result.


Then the stairs to the 'Lower Deck' still had to be made. For this 4 stairs were made. Although at that time I was satisfied with the stairs of the decks under the 'Lower Deck', I was of the opinion that the quality could be improved. With the previous stairs the steps are glued in slots, but these connections are still visible. I have now chosen another technique where I simply glue the steps against the side of the ladder. This method takes much more time, but now I'm really satisfied with the quality.


Then I fitted all the necessary beams for the bullets and the anchor points for the rear tackles of the '24 pound guns'.
We held another construction meeting over the view to the lower decks. At the decks below the 'Lower Deck' the supply openings, etc., were fitted with gratings. The openings in the middle have gratings up to half. If I would do this again with this deck, the view of the '32 pound guns' would be greatly reduced. Although I don't hate to make gratings, we decided not to put them in the middle of the deck anymore.
The next project was the 'rear cover'. This is on the drawings, but there are few pictures of it. If you look at the current pictures of Vic, this 'Rear Cover' seems to have been removed. If so, then the rudder has been shortened as well. As far as I have been able to investigate now this 'rear cover' could be removed in case of problems with the normal steering of the rudder.In the upper part of the rudder there is an extra hole in which a beam could be inserted, allowing the rudder to be operated with this beam.
The 'rear cover' is on the drawings, but there are some errors here and there. So I've been looking for pictures and finally I could only find a few. I decided to make the 'rear cover' as complete as possible, leaving out a few side panels. When this is placed, you can see the upper part of the rudder on the side.
For the upper part I had to learn the veneer technique. According to the drawings there is a figure in the top of the rudder and as far as I've been able to examine it this looks like a compass figure. I didn't want to delve too much into this and I've been more busy investigating the technique of veneering.In the end I milled the figure with a 0,8 mm milling cutter into the top and filled it with veneer from the book with veneer sheets for kitchen worktops that my daughter gave me.
Meanwhile I started with the back of the 'Ward Room' and this concerns the sofa and windows.
_____________
Greetings,
Henk


28 march 2020
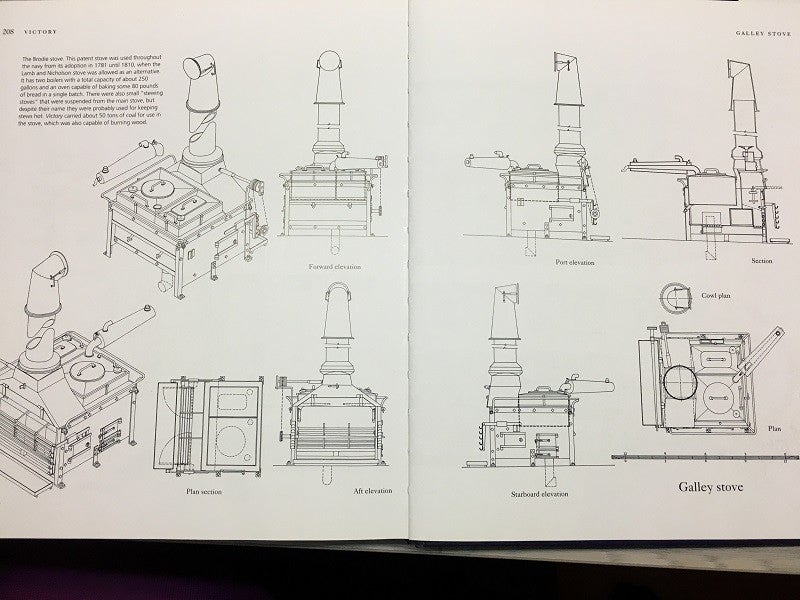
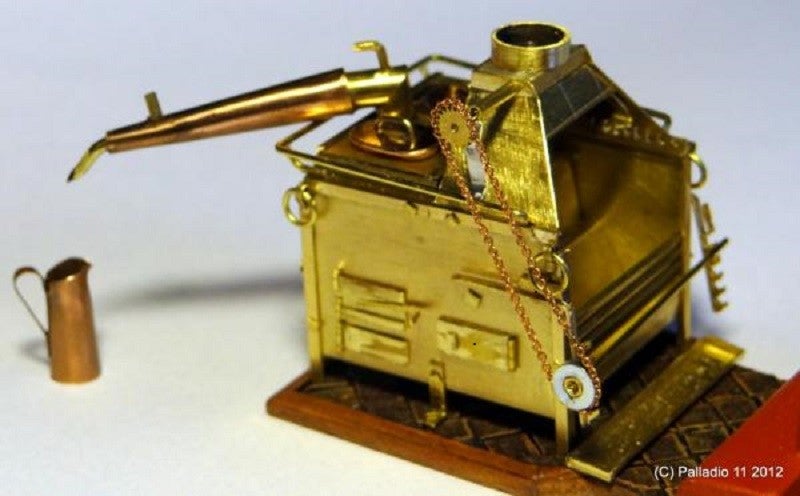
The Gunports are now ready and the tiled floor for The Brody stove has been laid and grouted. Most of the work is now in the production of the Brodie Stove and the 24 pound guns. The production of this I show in 2 building projects. In between these projects I will make the hatches for the Gunports, apply eyes here and there, etcetera.
_____________
Regards,
Henk


23 february 2020
In the past weeks I have been busy laying the tiles on the deck of the "Ward Room". The production of the black and white tiles took some time, but laying these tiles took a couple of weeks. Now there are all kinds of different methods to put the tiles on paper first, etc., but I just chose to lay them one by one.
In addition, I also started with planking the wall. On the previous deck I could easily fix the planks to the wall by inserting G-clamps through the gun gates. That doesn't work anymore because the hatches are around the bottom row of gates and I don't want to break them. So I work with long slats with which I push the planks against the wall.
The drawings of the "Brodie Stove" are ready and the first brass has arrived. The floor where the "Brodie Stove" will be placed is provided with tiles. Yesterday I started laying the tiles. Between the tiles there will be a grout of 0.2 mm and as soon as the floor is ready, it will be grouted completely. As soon as the tiled floor is ready, I start building the "Brodie Stove" and the 24 "pound guns".
_____________
Regards,
Henk


25 january 2020
I've started the Middle Deck. With my previous decks I first did all the preparations, but with this deck I just started planking the deck. In the meantime I have made my preparations.
The 'Ward Room' has removable walls and with these walls divided into several compartments. These were removed as soon as shots had to be fired. Because the guns at Vic are in fighting position, I leave these walls away.
The floor of the 'Ward Room' is provided with black and white tiles that are laid under 45 degrees on the deck. It's impossible to tell if these tiles were placed immediately during construction or at a later time. After consultation with the lady of the house, who of course was involved in the preparations, it was decided to apply these tiles.
Furthermore, on the "Middle Deck" there are 28 pieces of 24 pound (Long) guns. The 24-pound gun carriages have the same dimensions as the 32-pound guns. I've already ordered the brass for the 24 pounds and the 12 pounds guns. This will arrive in the coming weeks.
I had to think for a while what and how I am going to make the "Brodie Stove". The simplest of course is made of wood, but I had kept some pictures of a fellow modeller somewhere and he made this one of brass for his ship. Now I have received hundreds of pictures of the HMS Victory from Jan Zwart and he has made a lot of pictures of the "Brodie Stove". Furthermore the "Brodie" is clearly drawn in the book "H.M.S. Victory, Her Construction, Career and Restoration". So I have to draw it completely on a scale of 1: 48. After some tests with my machines in the workshop I decided to make the "Brodie" entirely of brass.
I will put the special building projects in several blogs in the "Building Projects HMS Victory".
_____________
Regards,
Henk


We decided to let the plank run to the middle of the deck again. You may see less of the 'Lower Deck' when you look from above, but when I turn on the lights and you sit down at eye level there is still enough to see. We also have the pictures.
Because I was still busy with the preparations, I just started with the planking without sanding the deck in between. This afternoon the last planks have been put in and the deck will be sanded in the coming week. After that I will start with the black and white tiles.
_____________
Regards,
Henk