page 2, 1, previous
21 january 2018
Since this week I have been working on this project for 3 years, it is still not bored. Last week I was able to conclude another sub-project. The layout of the hold is ready. The' Light Space has 2 light sources and all deckbars are installed. The ventilation duct now stops behind the last deckbar, which is later extended to Orlop Deck.
So I'm starting now with a new blog / subproject, fitting the Orlop Deck.
________________
Regards,
Henk


14 january 2018
Building the back rooms takes a lot of time, but is progressing steadily. I decided to leave the Aft Powder Room completely out and only build the lower part of the Acces Room. Because the floor of the Floor Storage is inclined upwards, the construction beams must be level, hence they are inclined on the floor. The back wall of the Floor Storage has also been installed. I will be making the walls of the Wing and Light Space next week.
I get nice reactions to the videos posted. A video gives a better impression than a few photos. I will also regularly post a video, removing an older one. To do this way I keep enough space to upload.
________________
Regards,
Henk


7 january 2018
The headhold is now almost ready, a few small things still need to be applied. I have now started with the rear part of the hold. This part of the hold is divided into 7 parts, in the fourth picture there is an overview of these rooms. The Floor Storage is also equipped with ventilation ducts on this side. I place 1 channel, just like in the front, so that the view remains good.
End december, I received a message from my internet service provider that I can now also post videos on my site. To try it out, last week I placed the first video. Despite all the nice reactions, I'm bullying myself again. When watching the film, I see things that I should have been looking at for a while, etc. You will probably also see these dots, but bet they are gone with the next film; -)
Below is also a movie this morning
________________
The best wishes for 2018
Henk


31 december 2017
A short overview video
30 december 2017
In the production of the walls for the Hold Well, I ran into a big problem. The drawing indicates that the Hold Well must be fitted with a door, but this does not appear in any other drawing. As far as I can judge now, there is no door in the current version of the Hold Well.
I have seen a photo that somebody built the door in it, but I don't have sizes, height, etc. Now I received an extra drawing from John McKay at the time, which is also shown on page 144 in Alan McGowan's book. After some searching I was able to find the door mounting in the version before 1805. It is difficult to see, but there was a door in the Hold Well from before 1805.
Because I follow John's drawings, I took the door as much as possible in scale in the Hold Well. The Hold Well has now been installed, including the shot locker. The door hinges are made of brass and they are black again with brass black. Behind the Hold Well a light source has been installed and I deliberately omitted the cover construction in the hole of the Well. The intention is that I build a pump half open and it should remain visible.
________________
Regards,
Henk


24 december 2017
Up to the main mast, where the Hold Well will soon be located, the work only concerns the installation of the deckconstruction. According to my lighting plan, a light source must be present at deck beam 68 again, here a visible lantern will be hanging.
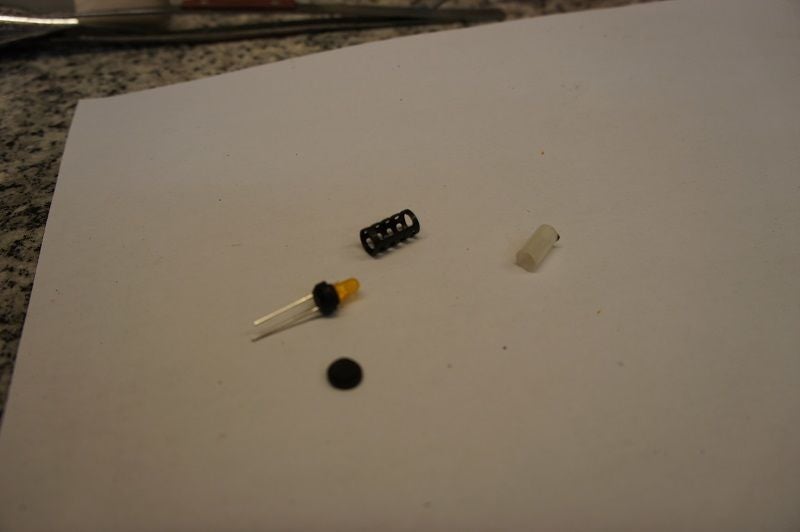
The dimensions of a lantern on the real Vic are 21" high and 7.5" in diameter. My goal was to approximate these dimensions in scale 1:48 as much as possible with the LED lamps, etc. My lanterns consist of 5 parts. The upper side, to which the LED lamp is attached, is made of ebony wood, just like the bottom plate. The part between the top and bottom consists of 2 parts, a styrene white tube and a brass frame.
This brass frame takes most of the time. For this I use a brass tube, where I cut the holes in routing. For this I use a divider on the milling machine with a 1 mm cutter. Especially milling takes some time. Now there are quite others production methods for the framework, think of CNC or 3D printing. Personally, I think that nothing has anything to do with model making, I consciously choose manual craftsmanship.
After having blackened the brass frame with brass black, the lantern could be put together. The lantern was first tested extensively outside the boat and hung under deck beam 68. The power wires run through the deck beam to the wire tree again.
I am satisfied with the first lantern. I can make lanterns in between works by making a large stock of lanterns.
So there is plenty of work to do
________________
Fine Christmas Days
Henk


16 december 2017
My lighting plan for the hold is now ready. After external advice, I decided to focus on the hold with an orange glow. The orange glow makes it a little more mysterious. If I were to use yellow or white light, it would become a workplace with bright lighting.
The Hanging Magazine will soon appear in the hole at deck beam 51 and it will run under the deck beams. By making a light point in deck beam 51, you will no longer see the light source. No worries...... Visible lanterns will also be placed in the hold, the necessary materials have been ordered.
The greatest care is to remove the wires invisibly. These are now hidden between the deck construction and the frames. There is a ventilation trench under the deck construction and no wires should be visible there. This gives some extra work.
To feed a light point, I work the wires away in the deck beams. Normally I usually make it out of one piece, but now I make the bar out of 2 layers. In the lower part I milling 2 grooves for the power supply wires, then I solder them to the LED lamp and assemble it all together with the upper part.
For the rest, a few atmospheric photos.
________________
Regards,
Henk


10 december 2017
The platform is placed on the side of the main hold and the deck structure above the front platform is ready. Between the last 2 deck beams there was a complicated piece of work. There the lodging knees cross over each other, so that the anterior one runs down with a rounding. The drainage channels are covered with shelves up to the main mast. I have deliberately placed one next to the gutter so that one can see how it is arranged.
I was still hesitating for a while about whether I would make barrels, etc., to put in the mainhold. The problem is that if I start here at the beginning, this must continue everywhere. After extensive consultation, here at home, it was decided not to do so. As soon as I lay down barrels, etc., the view from the side is restricted.
Next week I'll be working on the deck beams where the hanging magazine will hang and in the meantime I'll be preparing the Hold Well. The latter is placed around the main mast.
________________
Regards,
Henk


3 december 2017
Last Tuesday evening Brother-in-law Rob came by to connect the LED lights and make everything working. He was somewhat disappointed that only 2 lamps had to be connected. He thought he had to connect up to 30 lamps. I understand his disappointment, but for me it was more important to know if everything works according to plan and how I had to connect everything. Then I can continue with my lighting plan.
Because the system delivers 5 Volts, the LED lamps are switched in series for every 2 units. If I would connect the lamps normally, then there must be a resistor for it and every resistor costs one lamp. After the lesson electricity he connected everything and we placed the wall. Just search with the coil and there is light in Vic. Everything now seems to be burning brightly, but that will be reduced if more LED lights are connected.
The power supply wires of the first lamps are now neatly concealed and the partition between the front and middle hold is placed. The deck structure above the front hold is ready. I couldn't stop this afternoon from checking everything again and taking some atmospheric pictures.
On to the middle hold
________________
Regards,
Henk


26 november 2017
The 2 anchor bitts are finally in place and ready. The anchor bitts styles are placed on the floor of the hold, run through Orlop Deck and then end up on the Lower Deck. Because the deck construction is around the bitts styles, I had to place them now. It took three evenings to measure and place them correctly. The latter was more for me because I was not satisfied with the first placement.
Brother-in-law Rob was supposed to come by last week for the lighting, but that has been moved to next Tuesday. Luckily I have several projects running and I don't have to sit still. One of the following projects is the platform that is placed in the middle space against the partition wall, with the front hold.
I was immediately confronted with the fact that the platform on John's drawings differs in part from what other builders have built or built. For example, there are even more minor deviations. I assume that John's drawings reflect the reality of the period before 1805 and have decided to build completely in accordance with the drawings. For example, I placed a semi-circular beam on the front side of the platform and the square supports underneath the platform are partly round.
________________
Regards,
Henk


