3 march 2019
Before I can start placing the guns, etc., I first had to make the controls of the rudder. At the H.M.S. Victory lies the "Tiller" with a "Goose Neck" on the Tiller Sweep. Before I could fit the Tiller I first had to remove the rudder completely. An eye of a hinge had broken off and it had to be repaired first.
The production of the "Tiller Sweep" took quite some time. It had to be milled on two sides. I have already indicated that I don't want to use CNC control or 3D printing for my model. I really want to make everything manually and then it takes some extra time. I made a mould for the "Tiller Sweep" in which I can manually mill the slots into it perfectly. It goes with tenths of millimeters, but in the end it worked perfectly.
After that the "Tiller" is equipped with the necessary ropes. The ropes will soon run through rigging blocks through the "Middle and Upper Deck" up to the steering wheel on the Quarter Deck. The first rigging blocks will soon be placed in the deck construction of the "Middle Deck".
The first deck beams of the "Middle Deck" have been placed and before I can finish this further the first hatch has to be finished on the outside. Every hatch is operated by ropes and I really want to install it.
Now the hatches of the "Lower Deck" are equipped with a 'Gun Port Scuttle' and on this scale they would be about 3 by 5 mm. The Scuttle has a hinge so it can be opened and closed. I have used 4 shutters to install a 'Scuttle'. Now the 'Scuttle' itself is no problem, but the hinge is too small and too weak to open and close. Now I can put a ring on the hatch, making it look like there is a 'Scuttle' in it, but I decided not to do that and just leave it out. I only want to apply things that just do it. (sorry Jan)
Meanwhile the first hatch has been fitted with hinge pins and before I can attach the ropes to the hatch a "Drip Shield" must first be fitted. Most 'Gun Ports' are equipped with such a 'Drip Shield'. After a few tests with brass I decided to make this one from ebony. Eventually the milling machine turned out to give the best result and so the first one is now mounted on the outside.
Now first the ropes for operating the hatch, then the first cannon and finish the deck construction.
To be continued.
________________
Regards,
Henk


1 december 2018
In between all the projects there was also some time to apply some parts to the Lower Deck. For example, all the beams on which the bullets are placed and also the eyes where the 'Training Tackles of the gun carriages are placed on the deck.
For the sea trip, the guns were firmly secured according to the picture below left and the hatches were also secured with extra ropes. For this purpose 4 extra eyes have been added per hatch.
In the coming weeks I will start with the production of the guns. Then I can place them on the gun carriages and finish the assembly. In the meantime I'm sorting out the ropes. I also make the ropes for the tackles, etc., and the 'Rigging Blocks' myself and that takes some preparation. With all the subprojects, the current project has grown a little bigger than I had thought. It all makes it more fun to do.
________________
Regards,
Henk


18 november 2018
After planking the deck, the hull had to be planked on the inside. We finally decided to planking the inside of the hull with a neutral light color. This way the deck becomes a bit lighter and the parts that still have to be applied, stand out better.
Halfway through this year we have already decided that the gun gates will be fitted with hatches. These will be working hatches, including control cables, etc. That is why the inside of the gun gates are fitted with cover shelves in accordance with the drawings. To make the planks fit neatly with the wood on the outside, the lower and upper cover shelves are made of 2 types of wood. In this way the colours remain the same.
When building Vic I assumed that I only build what is attached to the ship. There was no discussion about the fact that therefore also the hatches should be fitted. It started with the last visit of Jan Zwart, who indicated that the guns are actually stuck to the wall. The breeching rope cannot be removed easily, etc. So my wife had heard the latter and, after Jan's visit, she went on of course. In the meantime I have heard dozens of arguments (thank you Jan).
In the past weeks I have investigated what is needed to put in cannons anyway. My starting point was and is that I can produce everything myself! This week I gave her the answer that I provide the decks with all the cannons, including a breeching rope, 2 side tackles and a train tackle. I have to change a bit on the upper decks, but that's no problem.
So 15 pieces of 32 pounders will be placed on the Lower Deck. You can follow the production of these cannons under the blog "Cannons" in the menu 'Construction projects HMS Victory.


Between the Lower Deck and the Orlop Deck there are 4 stairs that connect these decks. There are several ways to make these stairs. Mine is a bit more extensive, but this way the steps always look good.
I mill for the steps slots in the wood, in general, these are always about 0.7 mm deep. This I saw off later and so I get a plate where I can get 2 sides of the stairs from. This plate is then cut into 2 parts and made at the right height and width. After marking out the sides of the stairs, these 2 sides are made to size and the steps can be glued into the grooves.


The stairs have been placed and I also had some time left to put my knees at the riding bitts. In the coming period I will be working on several projects. I get some more material for the pumps, so I can also place them. I will also start with the hatches, etc. I will indicate on the homepage which blog I last completed.
________________
Regards,
Henk


4 november 2018
The last few weeks the work was monotonous. Today I put the last plank in the Lower Deck and sanded everything once quite well. After that I put Vic outside on the garden table and sprayed her clean with the air hose.
The planking of the deck is now ready and I have now started planking the hull on the inside. In the meantime I will also start working with the hatches, etc. This afternoon we have decided that the canon hatches, etc., will also be fitted. So there is a lot of work to do.
________________
Regards,
Henk


21 october 2018
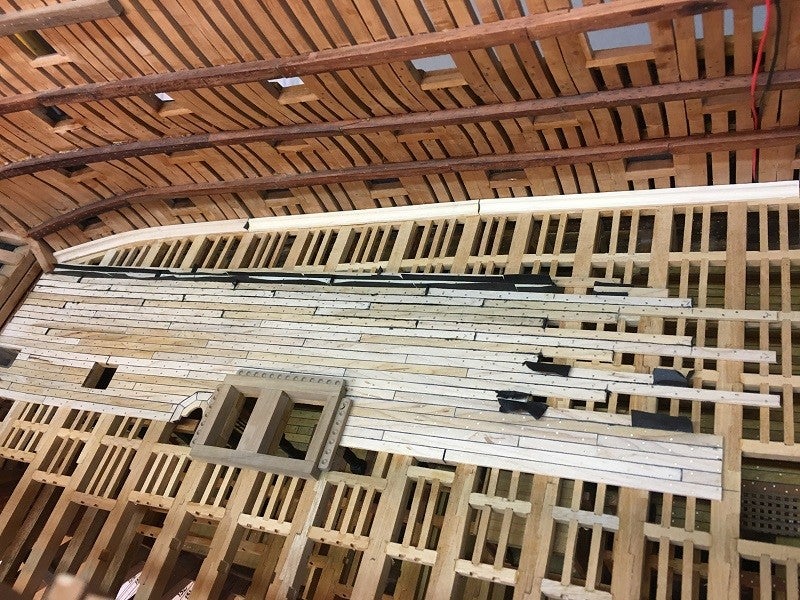
Now that the parts of the Chainpumps are ready, I can finally continue with the planking of the Lower Deck. The part around the Main Mast is slightly higher and the rear tubes of the pumps stick through this part. The front tubes then pass through the normal deck.
Placing the tubes was quite a job and also took a lot of time because the tubes run through two decks. Finally they are now in the right place. As soon as the deck planks are on and all the sanding work is done, only then the pumps are placed.
For the time being I can continue with planking the deck and the dust on the bottom pictures I will remove as soon as possible.
________________
Regards,
Henk


15 september 2018
I have now started planking the Lower Deck. The planks are made of American maple wood, namely American Hard Maple. This wood is harder and slightly heavier than the European maple wood and therefore perfect for decks. I lay the planks in the well-known English plank system and between each plank a black paper strip is glued. This is cut away after drying and as soon as everything has been sanded, I have perfect seams. I use 120 grams black paper for this.
Around the stair galleries are beams where the cannonballs could lie. The cutouts for this I cut in the beam with a Ball Nose cutter.
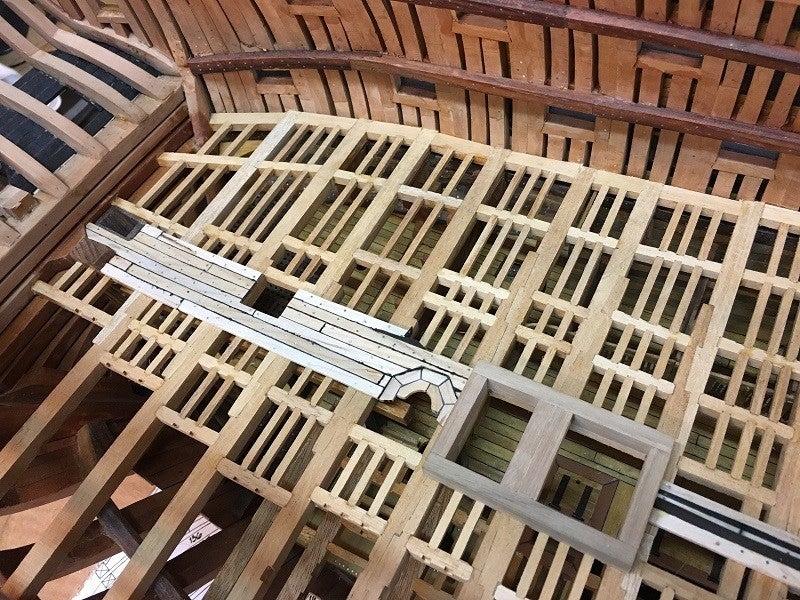


A waterway is used to ensure that the deck plank matches the hull plank. The Lower Deck uses a beam that is partly hollow for this purpose. Also for this I use a Ball Nose cutter.
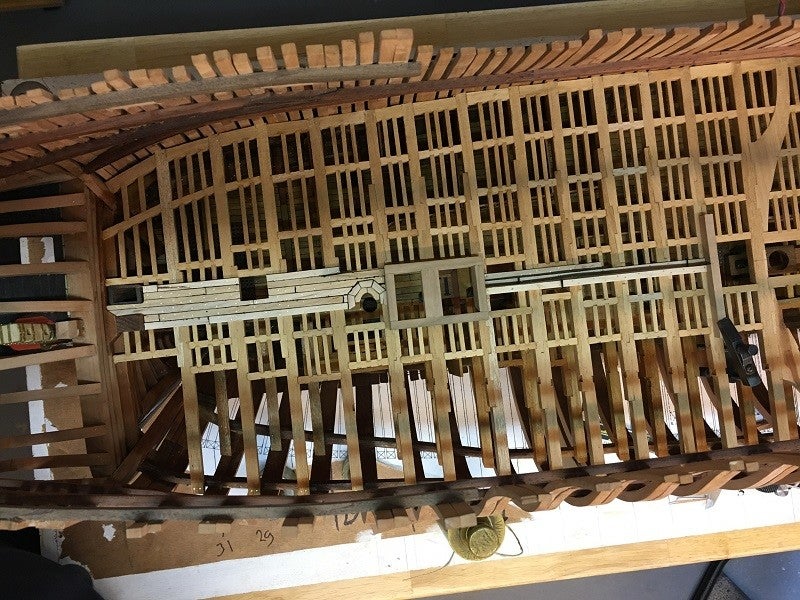
The deck is now for 1/3 part planked and sanded. It will be sanded once more when the entire deck is ready. When sanding now the problem is that all dust falls down, despite that I try to seal all holes as much as possible. I now take Vic out of the mould once every 2 weeks and put her on a few pillows on the garden table. I spray her completely clean with the air hose, goes perfectly and my workshop stays clean.


Meanwhile, the construction for the gratings, so the ropes from the anchor to the Orlop Deck run ready and placed. This construction is equipped with 2 sliding pieces where the anchor ropes slide over. First I'm going to build the 4 Chainpumps and the 2 Elm Tree pumps. Then I can place them and planking the middle piece.
________________
Regards,
Henk


